2018 年在台灣的 Angular Conference 聽到 Schematics 這個東西就很想使用看看,不過一直沒有機會,最近我們專案開始有其他人加入,對於要做哪些設定或是要新增哪些檔案不是很清楚,為了增加團隊的生產力,立刻想到可以用 Schematics 這個懶人工具,可以自動產生程式碼,也可以省去 email 或口頭溝通的時間,網路上找到一篇不錯的教學,這篇文章有點像翻譯,不過加上一些自己的使用情境,希望可以幫到一些懶人工程師。
這篇文章會涵蓋下列的這些主題
- 新增一個 schematics 的 workspace
- schematics 概念簡介,包含 Factory, Rule, Tree 等等
- 建置 schematics
- 執行 schematics
- 實作簡單的 schematics
- 讓 schematics 使用參數
- 在 schematics 使用 template
- 整合 schematics 的指令到 angular cli workspace
前置作業
在開始之前,先安裝 @angular-devkit/schematics-cli 才可以使用 schematics 指令,建議用 global 安裝,因為這個程式和 Angular 獨立的,我們可以使用 schematics 來產生各種樣板程式碼,減少時間。
# install schematics-cli globally
npm install -g @angular-devkit/schematics-cli
新增 schematics 的 workspace
先新增一個空白的 schematic 吧。
# 新增 schematics
schematics blank hello
新增完之後會看到在我們的專案中有個新的資料夾 hello,裡面有些預設的檔案,來看一下一些比較重要的檔案。第一個是 collection.json,這個檔案主要的 definition 檔,裡面包含了所有定義的 schematics。collection.json 的內容如下:
// collection.json
{
  "$schema": "../node_modules/@angular-devkit/schematics/collection-schema.json",
  "schematics": {
    "hello": {  // schematics 的名稱
      "description": "A blank schematic.",
      "factory": "./hello/index#hello"     // scehmatics 要執行的 function 的路徑以及 function 名稱
    }                                      // 在這邊就是要去執行 ./hello/index 檔內的 hello function
  }
}
接下來看一下程式的本體吧,看一下 ./hello/index.ts 的內容
import { Rule, SchematicContext, Tree } from '@angular-devkit/schematics';

// You don't have to export the function as default. You can also have more than one rule factory
// per file.
export function hello(_options: any): Rule {
  return (tree: Tree, _context: SchematicContext) => {
    return tree;
  };
}
schematics 概念簡介
Schematic Factory
首先,hello 這個 function 就是一個 factory,這個 factory 回傳一個 Rule。可能有人會質疑為什麼我們需要一個 factory,而不直接實作 rule 就好了。因為我們會在不同的情況下使用 schematics ,所以我們需要視情況做調整。
Rule
另外一個重要的部分就是 Rule,Rule 被呼叫時需要 tree 以及 SchematicContext。當被呼叫時,Rule 會做 tree 做調整,並且回傳調整後的 tree,以便後續使用。
Tree
Tree 是一個虛擬的資料夾結構,使用虛擬的資料夾結構有幾個優點
- 只會在 schematic 成功結束後才真的做出改變
- 可以使用
--dry-run來預先看一下產出,而不用真的新增/修改檔案 - 提供更好的效能,因為並不是在流程中對檔案作操作
建置 schematics
我們的 schematics 用 typescript 撰寫,不過我們是跑在 node 環境下,所以在執行之前要記得編譯所有的 .ts 檔,不然執行是會失敗的。
npm run build
因為需要編譯,如果在開發的過程當中每一個小修改都要編譯一次有點麻煩,也可以新增一個新的 command 到 package.json 內,就可以支援 hot-loading 了。
{
  "scripts": {
    "build-watch": "tsc -p tsconfig.json --watch"
  }
}
執行 schematics
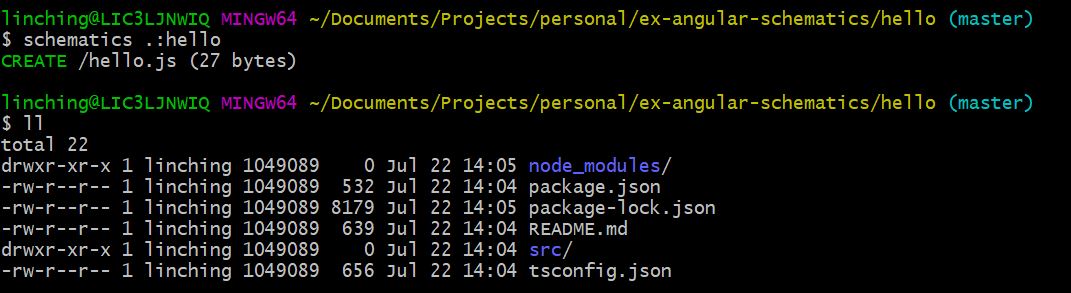
可以直接使用 schematics cli 來執行特定的 schematic,指令格式為 schematics <package-name>:<schematic-name> [...options]。Package name 可以是類似 @schematics/angular,而 schematic name 可以為 component。schematic cli 預設會去 node_modules 裡面找到對應的 package 以及 schematic 執行。不過因為我們的 hello 還不是一個 package,這種情況下我們可以用以下指令執行
schematics .:hello
執行結果如下:

當然也可以在其他層的資料夾透過相對路徑來執行,例如我們現在回到前一層資料夾,再次執行

實作簡單的 schematics
終於到重頭戲了,要開始實作第一個 schematic 了。來小小修改一下 hello schematic,當執行 hello schematic 的時候產生一個 hello.js 的檔案,內容為 console.log('Hello World');,要做到這件事情,可以用 .create(),程式碼如下:
import { Rule, SchematicContext, Tree } from '@angular-devkit/schematics';

export function hello(_options: any): Rule {
  return (tree: Tree, _context: SchematicContext) => {
    tree.create('hello.js', `console.log('Hello World');`);  // 新增這行
    return tree;
  };
}
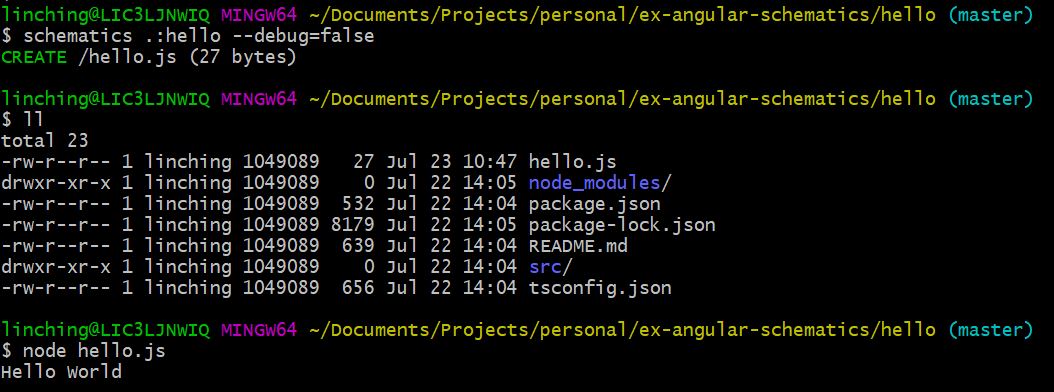
再次執行 hello,執行結果如下
詭異的事情發生了,明明就寫了 CREATE 不過為什麼在資料夾內沒有新增檔案呢?因為當我們使用相對路徑 . 的時候,schematics 會用 debug mode 執行。debug mode 執行的結果和使用 --dry-run 一樣,並不會真的有檔案的 IO,可以使用 --debug=false 或是 --dry-run=false 來關閉,再執行一次就可以看到真的有個 hello.js 被新增出來了,執行結果也如預期印出了 Hello World。
讓 schematics 使用參數
不過這樣還不算是個有用的 schematic,現在我們加點東西,讓 schematic 讀參數。schematic 的 _options 包含了一起傳進來的 flags,假設我們的指令會是 schematics .:hello --name=Jimmy --debug=false,修改一下 schematic 的程式碼:
import { Rule, SchematicContext, Tree } from '@angular-devkit/schematics';

export function hello(_options: any): Rule {
  return (tree: Tree, _context: SchematicContext) => {

    const { name } = _options; // 從 _options 讀取 name

    tree.create('hello.js', `console.log('Hello ${name}');`);
    return tree;
  };
}
上面的做法沒有問題,不過這會把所有的 flags 都傳進來,有些參數可能不是我們需要的,或是格式錯誤,這種情況可以新增 Schema 來描述參數的格式以及做驗證。在 ./src/hello 資料夾新增檔案 schema.json,內容如下:
{
  "$schema": "http://json-schema.org/schema",
  "id": "HelloSchematics",
  "title": "Hello Option Schema",
  "type": "object",
  "description": "Say hello to someone",
  "properties": {
    "name": {
      "type": "string",
      "description": "The name of the person",
      "$default": {
        "$source": "argv",
        "index": 0
      }
    }
  },
  "required": [
    "name"
  ]
}
檔案中 properties 就是要傳進來的參數,type 可以接受不同種類比方 string、boolean 或是 enum,另外這邊使用了 positional option 的方式,因此不一定要寫 --name,只要是第一個參數,就會被 assign 到 name 上。接下來要讓 collection.json 知道要去哪邊找這個 schema.json,修改 collection.json 內容如下:
{
  "$schema": "../node_modules/@angular-devkit/schematics/collection-schema.json",
  "schematics": {
    "hello": {
      "description": "A blank schematic.",
      "factory": "./hello/index#hello",
      "schema": "./hello/schema.json"
    }
  }
}
再來可以用 typescript 的 interface 幫我們做類別驗證,新增 schema.d.ts:
export interface Schema {
  name: string
}
修改 schematic 的 _options 類別為 Schema:
import { Rule, SchematicContext, Tree } from '@angular-devkit/schematics';
import { Schema } from './schema';

export function hello(_options: Schema): Rule {
  return (tree: Tree, _context: SchematicContext) => {
    const { name } = _options
    tree.create('hello.js', `console.log('Hello ${name}');`);
    return tree;
  };
}
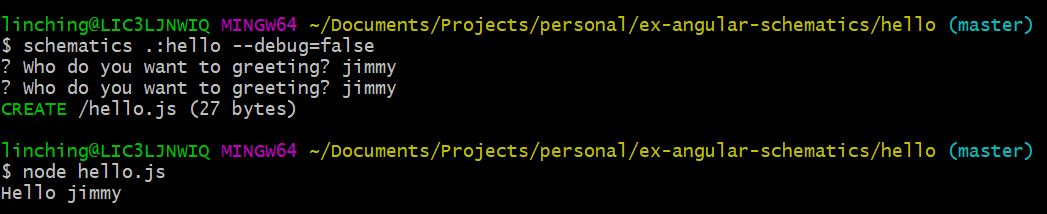
甚至新增 prompt 增加 UX,再次修改 schema.json,增加 x-prompt 於 name 下
{
  "$schema": "http://json-schema.org/schema",
  "id": "HelloSchematics",
  "title": "Hello Option Schema",
  "type": "object",
  "description": "Say hello to someone",
  "properties": {
    "name": {
      "type": "string",
      "description": "The name of the person",
      "$default": {
        "$source": "argv",
        "index": 0
      },
      "x-prompt": "Who do you want to greet?"
    }
  },
  "required": [
    "name"
  ]
}
一切都完成之後再次執行 schematics .:hello --debug=false
在 schematics 使用 template
到目前為止都是很基本的使用方法,在真實使用情境下,我們不可能在 schematic 的 function 寫所有的 code,這時候 Angular 提供的 template 就派上用場了。要使用 template,可以新增一個 ./files/ 資料夾,當然也可以取名其他的,不過可以看一下 tsconfig.ts,可以發現 src/*/files/**/* 已經被 exclude 掉了,所以編譯的時候不會編譯到這些檔案。
首先先增加一個資料夾叫做 hello-__name@dasherize__,乍看之下是個奇怪的名稱,不過其來有自。其中 __ 是特定的 delimiter 可以分開 name 變數和其他的部分。dasherizer 是一個 helper function,會收到 name 的值,做特定的轉換,@ 是特殊字元讓 name 使用 dasherizer helper function。這整段的意思是說,假設我們的名稱是 AwesomeWrap 會自動幫我轉換成 hello-awesome-wrap。接下來在這個資料夾中再新增一個類似的文件取名叫 hello-__name@dasherize__.ts,內容如下:
console.log('Hello <%= name %>');
有點像 Django 的 template 語法,用 <%= 和 %> 把參數夾起來,再 template 裡面也可以寫其他的 helper function,比如說:
console.log('Hello <%= dasherize(name) %>');

// or

console.log('Hello <%= classify(name) %>');
接下來要讓 schematic 的 fuction 和 template 串聯在一起。修改 ./hello/index.js 內容如下:
import { Rule, SchematicContext, Tree, url, apply, template, mergeWith } from '@angular-devkit/schematics';
import { Schema } from './schema';

import { strings } from '@angular-devkit/core';

export function hello(_options: Schema): Rule {
  return (tree: Tree, _context: SchematicContext) => {
    const sourceTemplate = url('./files'); // 取得 template 檔案
    const sourceParameterizedTemplates = apply(sourceTemplate, [
      template({
        ..._options,
        ...strings,
      })
    ]);

    return mergeWith(sourceParameterizedTemplates); // merge the template into tree
  };
}
接下來在執行一次指令 schematic .:hello 'jimmy lin' --debug=false
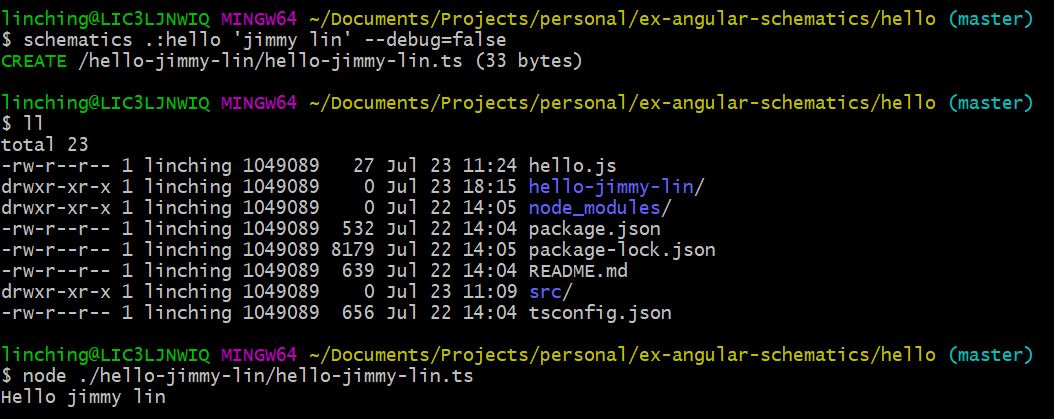
可以看到新的資料夾 hello-jimmy-lin 以及新的檔案 hello-jimmy-lin.ts,執行過後也丟出正確的歡迎訊息。
這個歡迎的訊息只是簡單的教學,實際上使用可能有很多情境,像是
- 針對不同的 endpoint 產生類似的 service 檔案
- 針對不同的 module 給同樣的 dependencies
- …
因為是 template 語言,所以常見的 if-else 或是 for-loop 也都有支援,詳細可以看一下他們的文件。未來如果有機會再補上。
整合 schematics 的指令到 angular cli workspace
目前都只是在 hello 這個 schematic 資料夾中操作,要懶就要懶到底,如果還要把產生的檔案手動複製到特定資料夾,那真得太麻煩了,來看一下怎麼整合 Angular CLI 吧。Angular CLI 通常都包含零到多個專案 (project),每一次當我們執行 ng generate component 時,都是在某個專案中執行。angular.json 中有指明了 defaultProject 是哪一個,當然下指令時也可以用 --project some-app 來指定要跑在哪個專案下。要整合在一起就首先修改 scehma.json:
{
  ...
  "properties": {
    "project": {
      "type": "string",
      "description": "Generate in specific Angular CLI workspace project",
    }
  ...
}
以及 schema.d.ts
export interface Schema {
  name: string;
  project?: string;
}
接下來要修改一下 ./hello/index.ts,看起來有點多不過簡單來說就是在找正確的路徑以及複製到正確的路徑下。
import { Rule, SchematicContext, Tree, url, apply, template, mergeWith, SchematicsException, move } from '@angular-devkit/schematics';
import { Schema } from './schema';
import { strings } from '@angular-devkit/core';

import { parseName } from '@schematics/angular/utility/parse-name';
import { buildDefaultPath } from '@schematics/angular/utility/project'

export function hello(_options: Schema): Rule {
  return (tree: Tree, _context: SchematicContext) => {
    const workspaceConfigBuffer = tree.read('angular.json'); // 看看執行的地方有沒有 angular.json 來確定是不是在 angular workspace 下
    if (!workspaceConfigBuffer) {
      throw new SchematicsException('Not Angular CLI workspace');
    }

    const workspaceConfig = JSON.parse(workspaceConfigBuffer.toString());   // 讀取 config
    const projectName = _options.project || workspaceConfig.defaultProject; // --project 或是 default project
    const project = workspaceConfig.projects[projectName];                  // 取得 project definition

    // buildDefaultPath(project)  取得預設的 project 路徑
    const defaultProjectPath = buildDefaultPath(project);

    // _options.name 可能包含路徑,比如說 some-feature/some-sub-feature/some-service
    // 利用 parseName 拆成 some-feature/some-sub-feature 以及 some-service
    const parsedPath = parseName(defaultProjectPath, _options.name);

    const { name, path } = parsedPath;

    const sourceTemplate = url('./files')
    const sourceParameterizedTemplates = apply(sourceTemplate, [
      template({
        ..._options,
        ...strings,
        name, // 覆寫 _options.name
      }),
      move(path)  // 複製到正確的路徑
    ]);

    return mergeWith(sourceParameterizedTemplates)(tree, _context);
  };
}
上面都設定好之後,就可以嘗試在 Angular workspace 執行看看

可以看到新增了檔案在 ./src/feature/hello-jimmy-lin 下。更酷的是已經直接幫我們把 help message 都寫好了:
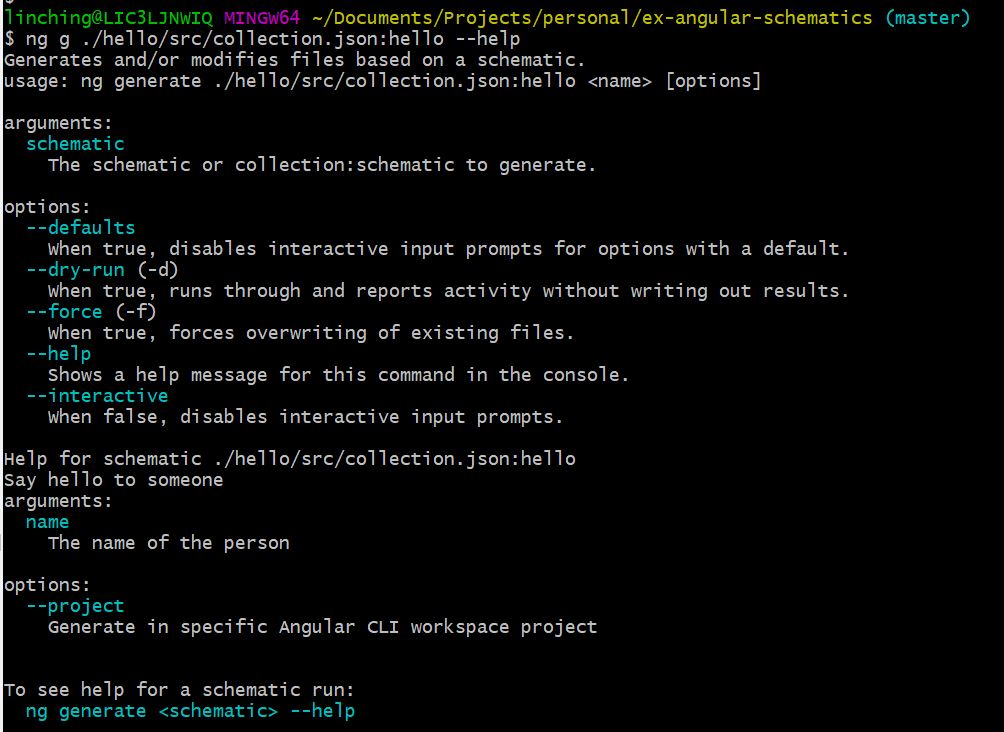
我覺得每次都要下 ./hello/src/collection.json 實在有點難記,有一招可以把他跟 schematics 指令整合在一起,首先安裝@schematics/angular,再來使用 npm link
npm link ./hello
之後就可以直接使用 ng generate hello:hello 執行。

以上就是第一階段的 Angular Schematics 教學,其實發現蠻多專案都會使用到,像是 Angular 本身就是使用 Schematics 產生 component 那些相依的檔案,另外 Angular Material 也會用 Schematics 來產生一些特定檔案,文件在這邊,比如說 drag-and-drop 可能有一些基本設定要設,Angular Material 就都先寫好了。
本文主要是參考這篇文章的,如有問題也可留言討論。 另外原碼在這邊:https://github.com/jimmylin212/ex-angular-schematics 也歡迎參考